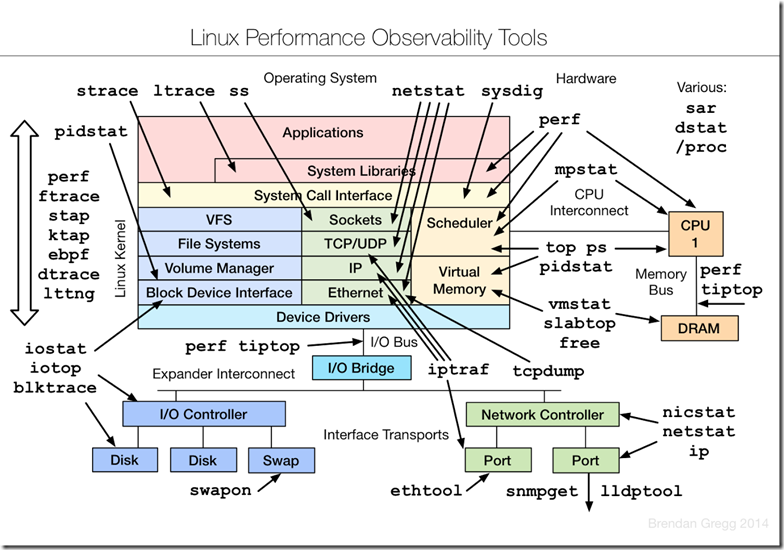
有很多有用的工具和命令,平时使用的很多,但是感觉自我总结的不如前辈们的好,秉承着不转载的原则,只是贴出链接
性能监控:
1 netstat工具:
Linux netstat命令详解
2 iperf工具:
这是测试两台机器之间的网络用的
在服务端运行iperf,输入命令
1
2
3
4
5
6
7
8
9
10
11
12
13
14
15
16
17
18
19
20
21
22
23
24
25
26
27
28
29
30
31
32
33
34
35
36
37
38
39
40
41
42
43
44
45
46
47
48
49
50
51
52
53
54
55
56
57
58
59
60
61
62
63
64
65
66
67
68
69
70
71
72
73
74
75
76
77
iperf –s –p 12345 –i 1 –M ``` 以在本机端口12345 上启用iperf 在客户端运行iperf,输入命令 ```c iperf –c server-ip –p server-port –i 1 –t 10 ``` 3 http_load:这是测试url的吞吐量用的 [http_load官网](http: ```c http_load -f 10000 -r 100 -s 10 -p 100 urls.txt ``` -fetches 简写-f :含义是总计的访问次数 -rate 简写-r :含义是每秒的访问频率 -seconds简写-s :含义是总计的访问时间 -parallel 简写-p:并发访问的线程数 urls是一个url 列表,每个url 单独的一行。可以单个页面。 4 fio:这是测试磁盘IOPS用的 [linux使用FIO测试磁盘的iops](http: **性能调优:** 1. gprof:[Linux性能评测工具之一:gprof篇](http: 这个工具比较轻量级,能看到所有的函数调用链,和函数运行时间,原生是只支持单线程监控的,通过文中的方法,可以支持多线程 2. Perf:[Perf -- Linux下的系统性能调优工具,第 1 部分](http: 比较复杂一点的监控程序 **编程用:** 3. c读取配置文件:很常用的功能,直接pull了一个 [c读取配置文件](http: 4. curl测试一个http请求的延时分析```c #!/bin/bash set -ecurl_format=' time_namelookup: %{time_namelookup} time_connect(TCP handshake): %{time_connect} time_appconnect(SSL handshake): %{time_appconnect} time_pretransfer: %{time_pretransfer} time_redirect: %{time_redirect} time_starttransfer: %{time_starttransfer} ———- time_total: %{time_total} ' exec curl -w "$curl_format" -o /dev/null -s "$@"
5.tcp测试connect
源代码
然后抓包看一下SYN的使用时间,就能定位连接的时间了
抓包可以参考这篇BLOG
Where SLOW
6.gd库进行图片压缩
源代码
png压缩后图片会变大,具体原因没深究,目前把png图片缩略以后当jpg存储
7.iptables防火墙设置
linux下IPTABLES配置详解
比如除了22端口全禁止
那么就是
1
2
3
4
-p INPUT DROP -p OUTPUT DROP -A INPUT -p tcp --dport 22 -j ACCEPT -A OUTPUT -p tcp --sport 22 -j ACCEPT
8.修改ip
/etc/sysconfig/network-scripts/ifcfg-eth0
然后service network restart
9.nginx如何将错误重定向到另外一台服务器
有两种方法
这一种是本地的错误导向其他服务器
1
2
3
4
5
6
7
8
9
10
11
upstream server2 { server 10.0 .0 .1 :80 ; } server { location /my_blog { error_page 404 = @try_server2; } location @try_server2 { proxy_pass http: } }
而这一种是把一个IP的proxy错误导向另外一个IP的服务器
如果想要把一组IP的错误导向另外一组IP的服务器,做复杂的主备线路,那么在两个proxy的ip上配置nginx再做proxy负载均衡即可
1
2
3
4
5
6
7
8
9
10
server { location / { proxy_pass http: } } proxy_next_upstream http_404; upstream online { server 172.16 .3 .17 :80 max_fails=0 ; server 172.16 .3 .18 :80 backup; }
404在nginx中是不认为是错误的,所以要用proxy_next_upstream http_404,否则会无限循环去请求主IP。
10.linux性能分析工具:
linux性能分析工具
11.top查看某个程序
如mongodb,top -p $(pidof mongod)
12.infer是facebook开源的一个代码静态分析工具
依赖gcc 4.8.2,python 2.7
1 infer -- make -o infer-out
这样就能对C的代码进行分析了,很方便,对于空指针和内存泄漏的判断可能不是很准,但是对于资源泄漏判断还是很准的。facebook还在改进它,期待
infer教程(需要翻墙)
infer中文教程
13.tcpcopy是国人开发的请求工具,能将线上流量引入线下系统中。对于故障在灰度的复现,或者是进行各种测试等等都很有帮助
不过美中不足的是使用中实际上会丢包
使用tcpcopy导入线上流量进行功能和压力测试
14.ThreadSanitizer又叫TSan,是一个检查线程Data Race的C/C++工具
Data Race是指多个线程在没有正确加锁的情况下,同时访问同一块数据,并且至少有一个线程是写操作,对数据的读取和修改产生了竞争,从而导致各种不可预计的问题。
只支持64位系统(内核版本也要够高,如果是centos fallback的版本,可能会出现??的函数),gcc 4.8版本以上,clang 3.2版本以上
1 2 3 4 5 6 7 8 9 10 11 12 13 14 15 16 17 18 19 20 21 22 23 24 25 26 27 28 29 #include <pthread.h> #include <stdio.h> int Global;void *Thread1 (void *x) { Global++; return NULL ; } void *Thread2 (void *x) { Global--; return NULL ; } int main () { pthread_create(&t[0 ], NULL , Thread1, NULL ); pthread_create(&t[1 ], NULL , Thread2, NULL ); pthread_join(t[0 ], NULL ); pthread_join(t[1 ], NULL ); }
ubuntu下要带上-ltsan,centos不需要带
1 2 3 4 5 6 7 8 9 10 11 12 13 14 15 16 17 18 19 20 21 22 23 root@ubuntu:~# gcc -o test test.c -fsanitize=thread -fPIE -pie -g -ltsan -m64 root@ubuntu:~# ./test ================== WARNING: ThreadSanitizer: data race (pid=1676 ) Read of size 4 at 0x7fe3f2778084 by thread T2: #0 Thread2 /root/test.c:12 (exe+0x000000000aad ) #1 __tsan_write_range ??:0 (libtsan.so.0 +0x00000001b1c9 ) Previous write of size 4 at 0x7fe3f2778084 by thread T1: #0 Thread1 /root/test.c:7 (exe+0x000000000a68 ) #1 __tsan_write_range ??:0 (libtsan.so.0 +0x00000001b1c9 ) Thread T2 (tid=1678 , running) created by main thread at: #0 pthread_create ??:0 (libtsan.so.0 +0x00000001eccb ) #1 main /root/test.c:19 (exe+0x000000000b36 ) Thread T1 (tid=1677 , finished) created by main thread at: #0 pthread_create ??:0 (libtsan.so.0 +0x00000001eccb ) #1 main /root/test.c:18 (exe+0x000000000b15 ) SUMMARY: ThreadSanitizer: data race /root/test.c:12 Thread2 ================== ThreadSanitizer: reported 1 warnings
如果把注释取消,设置了锁以后,则不会报错
要点:
1 除了加-fsanitize=thread外,一定要加-fPIE -pie,但是不要加-lpthread
2 -g 是为了能显示文件名和行号。
3 如果分生成obj(-c)和link两个步骤,每一步都加:-fsanitize=thread -fPIE -pie -g,并且在link的时候加-ltsan
4 只支持64位,最好指定编译64位(-m64)
5 如果依赖其他静态库,其他静态库编译时必须指定-fPIC(如果不是请重编)
另外还有AddressSanitizer,可以检测出内存访问越界(堆栈都可)
1
2
3
4
5
6
7
8
9
10
[root@centos ~]# gcc -fsanitize=address -fno-omit-frame-pointer -g -lpthread -o test test.c [root@centos ~]# ./test ASAN:SIGSEGV ================================================================= ==13390 == ERROR: AddressSanitizer: SEGV on unknown address 0x000000000000 (pc 0x000000400a47 sp 0x7fffb99c9d30 bp 0x7fffb99c9db0 T0) AddressSanitizer can not provide additional info. #0 0x400a46 (/root/main+0x400a46 ) #1 0x7f7b55487cdc (/lib64/libc-2.12 .so+0x1ecdc ) #2 0x400828 (/root/main+0x400828 ) ==13390 == ABORTING
另外AddressSanitizer和ThreadSanitizer不能一起用
15 qperf
能够查看网络带宽以及网络延时,还能看到各个包大小对网络延时的影响,对于机器的DEBUG是很不错的
1
2
3
安装:yum install qperf 服务端:qperf 客户端:qperf myserver -oo msg_size:1 :64 K:*2 -vu tcp_lat
16 快速删除大量文件
1
2
3
建立空目录/root/empty rsync --delete-before -avH --progress --stats /root/empty/ /tmp/test/log/
