分析SSL握手失败问题

最近业务反馈在我负责的Serverless平台上执行的python脚本,访问azure的speechsdk失败,报错日志如下

1
2
3
4
5
6
7
8
2024-09-02 18:47:16.455 Azure OpenAI is listening. Say 'Stop' or press Ctrl-Z to end the conversation.
2024-09-02 18:47:16.457 SESSION STARTED: SessionEventArgs(session_id=1f5fbe81d5e44fd999adec19ec4d8ffb)
2024-09-02 18:47:18.345 CANCELED: SpeechRecognitionCanceledEventArgs(session_id=1f5fbe81d5e44fd999adec19ec4d8ffb, result=SpeechRecognitionResult(result_id=40be7cc2eb02493095a25bc74c729cb1, text="", reason=ResultReason.Canceled))
2024-09-02 18:47:18.345 CANCELED DETAIL:CancellationDetails(reason=CancellationReason.Error, error_details="Connection failed (no connection to the remote host). Internal error: 1. Error details: Failed with error: WS_OPEN_ERROR_UNDERLYING_IO_OPEN_FAILED
wss://southeastasia.stt.speech.microsoft.com/speech/universal/v2
X-ConnectionId: 1f5fbe81d5e44fd999adec19ec4d8ffb SessionId: 1f5fbe81d5e44fd999adec19ec4d8ffb")
2024-09-02 18:47:18.346 SESSION STOPPED SessionEventArgs(session_id=1f5fbe81d5e44fd999adec19ec4d8ffb)
2024-09-02 18:47:18.346 CLOSING on SessionEventArgs(session_id=1f5fbe81d5e44fd999adec19ec4d8ffb)

业务把wss协议改成ws协议以后,就可以正常访问服务了

同时在Serverless平台以外,直接在该镜像下也是可以正常访问服务的

因此合理怀疑是Serverless平台的python脚本,使用SSL会存在问题

根据SSL协议大致定位问题

从speechsdk上看不太出来SSL的报错,因此写了一个简单的脚本复现问题

1
2
3
4
5
6
7
8
9
10
11
12
13
14
15
16
17
18
19
import ssl
import socket
import asyncio

async def test_ssl() -> int :
hostname = "oss-cn-shenzhen.aliyuncs.com"
port = 443
context = ssl.create_default_context()

with socket.create_connection((hostname, port)) as sock:
with context.wrap_socket(sock, server_hostname=hostname) as ssl_sock:
cert = ssl_sock.getpeercert()
tls_version = ssl_sock.version()

print("SSL Certificate: ", cert)
print("TLS Version: ", tls_version)
return 0

asyncio.get_event_loop().run_until_complete(test_ssl())

经过平台的sdk适配后,在平台上运行报错

1
2
3
4
5
6
7
8
9
10
11
12
13
py throw ex:Traceback (most recent call last):
File "/data/pyScripts/Script0/P00044_test_ssl.py", line 38, in buffered_test_ssl
await test_ssl();
File "/data/pyScripts/Script0/P00044_test_ssl.py", line 13, in test_ssl
with context.wrap_socket(sock, server_hostname=hostname) as ssl_sock:
File "/data/LeafDynLib/python3.7.8/lib/python3.7/ssl.py", line 423, in wrap_socket
session=session
File "/data/LeafDynLib/python3.7.8/lib/python3.7/ssl.py", line 870, in _create
self.do_handshake()
File "/data/LeafDynLib/python3.7.8/lib/python3.7/ssl.py", line 1139, in do_handshake
self._sslobj.do_handshake()
ssl.SSLCertVerificationError: [SSL: CERTIFICATE_VERIFY_FAILED] certificate verify failed: unable to get local issuer certificate (_ssl.c:1091)
;

这下可以确定是SSL握手错误了,抓包看下具体错误情况,在两个Hello结束后,服务端发送了证书,客户端返回了Fatal,内容为Description: Unknown CA (48)

查看了一下服务端的证书机构,红框内可以看到根证书是BE颁发的GlobalSign Root CA:
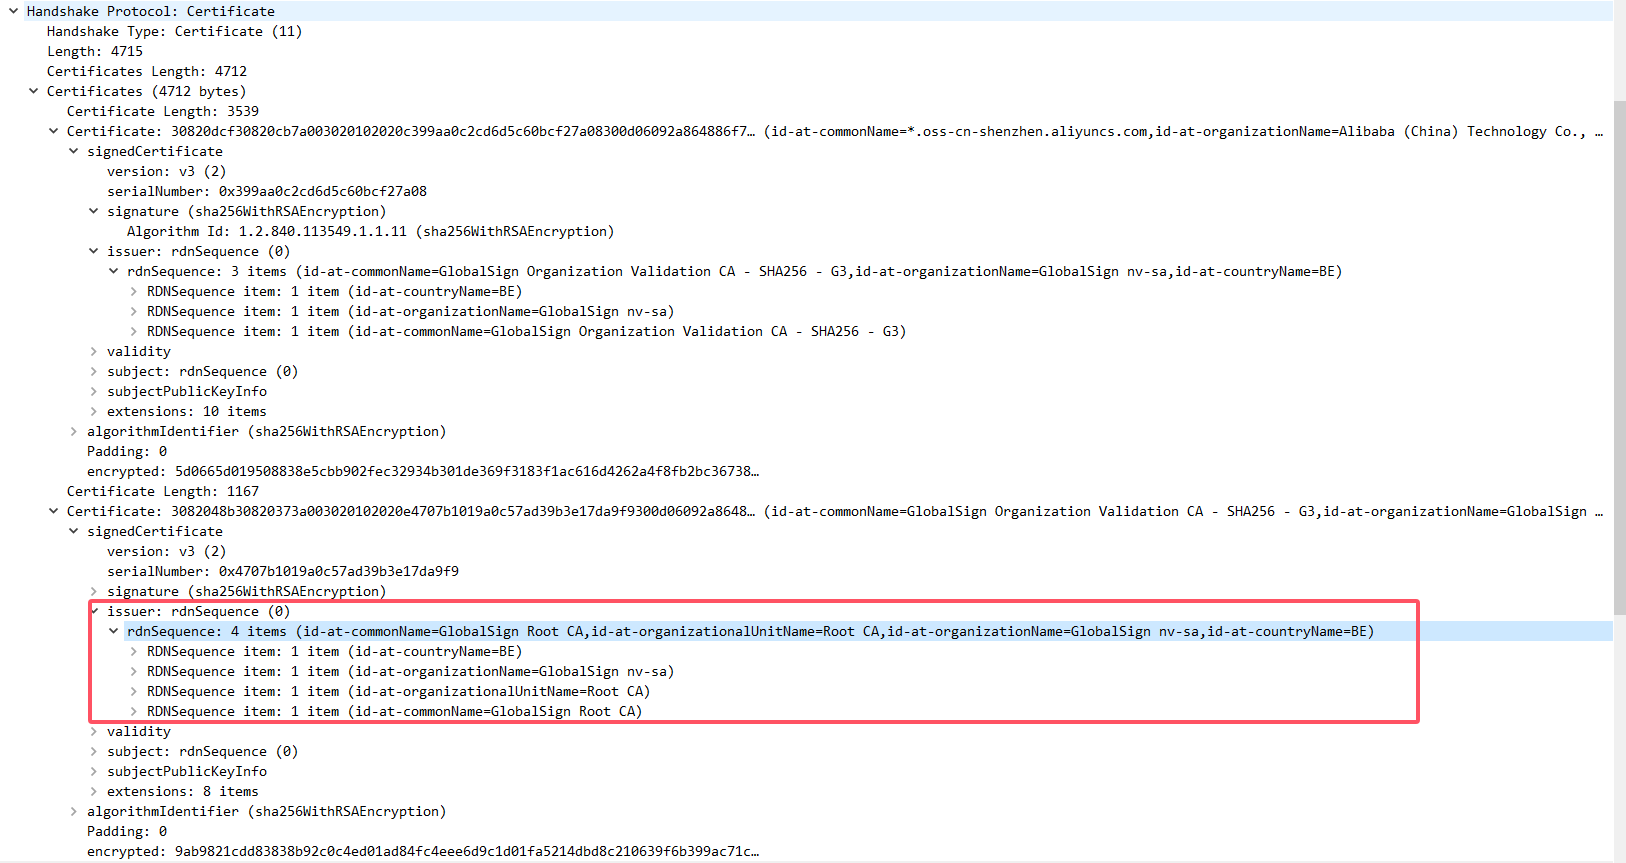
随后查看机器上有没有这个来自于BE的GlobalSign Root CA证书

1
2
~ awk -v cmd='openssl x509 -noout -subject' ' /BEGIN/{close(cmd)};{print | cmd}' < /etc/ssl/certs/ca-certificates.crt|grep GlobalSign|grep BE
subject=C = BE, O = GlobalSign nv-sa, OU = Root CA, CN = GlobalSign Root CA

证书的4个item都对的上,确实是存在的,那就可以猜测问题原因:握手失败是因为客户端没有正确读取到证书

指定python使用的证书验证猜测

查阅了python的文档:https://docs.python.org/zh-cn/3/library/ssl.html#ssl-contexts

其中SSLContext.load_verify_locations是用来加载证书的,那么使用certifi包额外下载python所需证书再加载应该就可以了

修改代码如下

1
2
3
4
5
6
7
8
9
10
11
12
13
14
15
16
17
18
19
20
21
22
23
24
25
import ssl
import socket
import asyncio
import certifi #新增包,用来找python的ssl证书路径

async def test_ssl() -> int :
hostname = "oss-cn-shenzhen.aliyuncs.com"
port = 443
context = ssl.create_default_context()

#新增3行代码如下
cert_path = certifi.where()
print("Path: ", cert_path)
context.load_verify_locations(cert_path)

with socket.create_connection((hostname, port)) as sock:
with context.wrap_socket(sock, server_hostname=hostname) as ssl_sock:
cert = ssl_sock.getpeercert()
tls_version = ssl_sock.version()

print("SSL Certificate: ", cert)
print("TLS Version: ", tls_version)
return 0

asyncio.get_event_loop().run_until_complete(test_ssl())

经过平台的sdk适配后,成功执行,并输出

1
2
3
4
~ python3 test.py
Path: /usr/local/lib/python3.5/dist-packages/certifi/cacert.pem
SSL Certificate: {'notBefore': 'Jan 26 02:11:18 2024 GMT', 'notAfter': 'Feb 26 02:11:17 2025 GMT', 'version': 3, 'serialNumber': '399AA0C2CD6D5C60BCF27A08', 'caIssuers': ('http://secure.globalsign.com/cacert/gsorganizationvalsha2g3.crt',), 'issuer': ((('countryName', 'BE'),), (('organizationName', 'GlobalSign nv-sa'),), (('commonName', 'GlobalSign Organization Validation CA - SHA256 - G3'),)), 'crlDistributionPoints': ('http://crl.globalsign.com/gsorganizationvalsha2g3.crl',), 'OCSP': ('http://ocsp2.globalsign.com/gsorganizationvalsha2g3',), 'subject': ((('countryName', 'CN'),), (('stateOrProvinceName', 'ZheJiang'),), (('localityName', 'HangZhou'),), (('organizationName', 'Alibaba (China) Technology Co., Ltd.'),), (('commonName', '*.oss-cn-shenzhen.aliyuncs.com'),)), 'subjectAltName': (('DNS', '*.oss-cn-shenzhen.aliyuncs.com'), ('DNS', '*.oss-cn-shenzhen-finance-1.aliyuncs.com'), ('DNS', '*.oss-cn-shenzhen-internal.aliyuncs.com'), ('DNS', '*.img-cn-shenzhen-internal.aliyuncs.com'), ('DNS', '*.oss-cn-shenzhen-internal-cross.aliyuncs.com'), ('DNS', '*.oss-cn-szfinance.aliyuncs.com'), ('DNS', '*.oss-cn-shenzhen-diku-internal.aliyuncs.com'), ('DNS', '*.oss-cn-shenzhen-finance-1-internal.aliyuncs.com'), ('DNS', '*.cn-heyuan.oss.aliyuncs.com'), ('DNS', '*.oss-cn-shenzhen-cross.aliyuncs.com'), ('DNS', '*.oss-enet-cn-south.aliyuncs.com'), ('DNS', '*.oss-internal.aliyuncs.com'), ('DNS', '*.oss-cn-guangzhou.aliyuncs.com'), ('DNS', '*.oss-cn-guangzhou-cross.aliyuncs.com'), ('DNS', '*.oss-accelerate.aliyuncs.com'), ('DNS', '*.oss-cn-heyuan-internal.aliyuncs.com'), ('DNS', '*.oss-accelerate-overseas.aliyuncs.com'), ('DNS', '*.aliyuncs.com'), ('DNS', '*.oss.aliyuncs.com'), ('DNS', '*.oss-cn-heyuan-cross.aliyuncs.com'), ('DNS', '*.img-cn-shenzhen.aliyuncs.com'), ('DNS', '*.oss-enet.aliyuncs.com'), ('DNS', '*.oss-cn-szfinance-internal.aliyuncs.com'), ('DNS', '*.vpc100-oss-cn-shenzhen.aliyuncs.com'), ('DNS', '*.cn-shenzhen.oss.aliyuncs.com'), ('DNS', '*.oss-cn-heyuan.aliyuncs.com'), ('DNS', '*.oss-cn-guangzhou-internal.aliyuncs.com'), ('DNS', '*.cn-guangzhou.oss.aliyuncs.com'), ('DNS', '*.cn-shenzhen-finance.oss.aliyuncs.com'), ('DNS', '*.cn-shenzhen-dualstack.oss.aliyuncs.com'), ('DNS', '*.cn-shenzhen-vpc.oss.aliyuncs.com'), ('DNS', '*.oss-accesspoint.aliyuncs.com'), ('DNS', '*.oss-cn-shenzhen.oss-accesspoint.aliyuncs.com'), ('DNS', '*.oss-cn-shenzhen-internal.oss-accesspoint.aliyuncs.com'), ('DNS', '*.oss-cn-heyuan.oss-accesspoint.aliyuncs.com'), ('DNS', '*.oss-cn-heyuan-internal.oss-accesspoint.aliyuncs.com'), ('DNS', '*.oss-cn-guangzhou.oss-accesspoint.aliyuncs.com'), ('DNS', '*.oss-cn-guangzhou-internal.oss-accesspoint.aliyuncs.com'), ('DNS', '*.cn-shenzhen.oss-console.aliyuncs.com'), ('DNS', '*.s3.oss-cn-shenzhen.aliyuncs.com'), ('DNS', '*.s3.oss-cn-shenzhen-internal.aliyuncs.com'), ('DNS', '*.cn-shenzhen.mgw.aliyuncs.com'), ('DNS', '*.oss.cn-shenzhen.privatelink.aliyuncs.com'), ('DNS', '*.oss-cn-shenzhen.oss-object-process.aliyuncs.com'), ('DNS', '*.oss-cn-shenzhen-internal.oss-object-process.aliyuncs.com'), ('DNS', 'oss-cn-shenzhen.aliyuncs.com'))}
TLS Version: TLSv1.2

深入定位根本原因

既然明确握手失败是因为客户端没有正确读取到证书,那么就要查一下python不依赖额外的certifi包的时候,是如何定位证书的了

在python的ssl库,有get_default_verify_paths这么一个函数,用来获取证书

1
2
import ssl
print(ssl.get_default_verify_paths())

经过平台的sdk适配后,在握手失败的Serverless平台上调用输出:

1
DefaultVerifyPaths(cafile=None, capath=None, openssl_cafile_env='SSL_CERT_FILE', openssl_cafile='/usr/local/ssl/cert.pem', openssl_capath_env='SSL_CERT_DIR', openssl_capath='/usr/local/ssl/certs')

而在握手成功的直接linux运行上则输出:

1
DefaultVerifyPaths(cafile=None, capath='/usr/lib/ssl/certs', openssl_cafile_env='SSL_CERT_FILE', openssl_cafile='/usr/lib/ssl/cert.pem', openssl_capath_env='SSL_CERT_DIR', openssl_capath='/usr/lib/ssl/certs')

可以发现capath,openssl_cafile,openssl_capath的值不同,其中capath最可疑,直接为None了,查看ssl库的实现,发现他会调用python的c接口来获取值

1
2
3
4
5
6
7
8
9
10
11
12
def get_default_verify_paths():
"""Return paths to default cafile and capath.
"""
parts = _ssl.get_default_verify_paths() #从cpython源码

# environment vars shadow paths
cafile = os.environ.get(parts[0], parts[1])
capath = os.environ.get(parts[2], parts[3])

return DefaultVerifyPaths(cafile if os.path.isfile(cafile) else None,
capath if os.path.isdir(capath) else None,
*parts)

编写脚本看下这个_ssl的返回值

1
2
import _ssl
print(_ssl.get_default_verify_paths())

经过平台的sdk适配后,在握手失败的Serverless平台上调用输出,得到的结果/usr/local/ssl/certs是不存在的路径:

1
('SSL_CERT_FILE', '/usr/local/ssl/cert.pem', 'SSL_CERT_DIR', '/usr/local/ssl/certs')

因此ssl.get_default_verify_paths()会返回cpath为None

而在握手成功的直接linux运行上则输出,得到的结果/usr/lib/ssl/certs是存在的路径:

1
('SSL_CERT_FILE', '/usr/lib/ssl/cert.pem', 'SSL_CERT_DIR', '/usr/lib/ssl/certs')

那么根据ssl.get_default_verify_paths()的实现,问题十有八九出在_ssl.get_default_verify_paths()

环境变量覆盖_ssl.get_default_verify_paths()返回值,验证猜测

1
2
3
4
5
6
7
8
9
10
11
12
13
14
15
16
17
18
19
20
21
22
23
24
#新增3行代码如下
import os
os.environ['SSL_CERT_FILE'] = "/usr/lib/ssl/cert.pem"
os.environ['SSL_CERT_DIR'] = "/usr/lib/ssl/certs"

import ssl
import socket
import asyncio

async def test_ssl() -> int :
hostname = "oss-cn-shenzhen.aliyuncs.com"
port = 443
context = ssl.create_default_context()

with socket.create_connection((hostname, port)) as sock:
with context.wrap_socket(sock, server_hostname=hostname) as ssl_sock:
cert = ssl_sock.getpeercert()
tls_version = ssl_sock.version()

print("SSL Certificate: ", cert)
print("TLS Version: ", tls_version)
return 0

asyncio.get_event_loop().run_until_complete(test_ssl())

经过平台的sdk适配后,成功执行!看来问题就出在_ssl.get_default_verify_paths()上了!

定位_ssl.get_default_verify_paths()异常原因

它的实现在https://github.com/python/cpython/blob/3.10/Modules/_ssl.c#L5290

1
2
3
4
5
6
7
8
9
10
11
static PyObject *
_ssl_get_default_verify_paths_impl(PyObject *module)
{
...忽略一些代码
CONVERT(X509_get_default_cert_file_env(), ofile_env);
CONVERT(X509_get_default_cert_file(), ofile);
CONVERT(X509_get_default_cert_dir_env(), odir_env);
CONVERT(X509_get_default_cert_dir(), odir);

return Py_BuildValue("NNNN", ofile_env, ofile, odir_env, odir);
}

cpython的四个返回值,看起来是对openssl库的X509_前缀函数的简单转发,其中ssl.get_default_verify_paths()的返回值capath对应X509_get_default_cert_dir()的返回值

查看openssl库的源码,crypto/x509/x509_def.c

1
2
3
4
5
6
7
8
9
10
11
12
13
14
15
16
17
18
19
20
21
22
#include <stdio.h>
#include "cryptlib.h"
#include <openssl/crypto.h>
#include <openssl/x509.h>

const char *X509_get_default_private_dir(void)
{ return(X509_PRIVATE_DIR); }

const char *X509_get_default_cert_area(void)
{ return(X509_CERT_AREA); }

const char *X509_get_default_cert_dir(void)
{ return(X509_CERT_DIR); }

const char *X509_get_default_cert_file(void)
{ return(X509_CERT_FILE); }

const char *X509_get_default_cert_dir_env(void)
{ return(X509_CERT_DIR_EVP); }

const char *X509_get_default_cert_file_env(void)
{ return(X509_CERT_FILE_EVP); }

X509_get_default_cert_dir指向了一个宏X509_CERT_DIR,定义在crypto/cryptlib.h

1
2
3
4
5
6
7
8
9
10
11
#ifndef OPENSSL_SYS_VMS
#define X509_CERT_AREA OPENSSLDIR
#define X509_CERT_DIR OPENSSLDIR "/certs"
#define X509_CERT_FILE OPENSSLDIR "/cert.pem"
#define X509_PRIVATE_DIR OPENSSLDIR "/private"
#else
#define X509_CERT_AREA "SSLROOT:[000000]"
#define X509_CERT_DIR "SSLCERTS:"
#define X509_CERT_FILE "SSLCERTS:cert.pem"
#define X509_PRIVATE_DIR "SSLPRIVATE:"
#endif

X509_CERT_DIR的值基于OPENSSLDIR和OPENSSL_SYS_VMS,而两者都是openssl库的编译参数

那么可以基本确定,Serverless平台和直接linux上运行的差异应该是openssl库的差别导致的

Serverless平台依赖/data/app/taf/tafnode/data/LEAF.ServerLessNode/data/ScriptEngineServerBin/817186/libcrypto.so.1.1

1
2
~ lsof -p 645125|grep crypto
ScriptEng 645125 root mem REG 253,21 11652640 3932377 /data/app/taf/tafnode/data/LEAF.ServerLessNode/data/ScriptEngineServerBin/817186/libcrypto.so.1.1

它的编译参数如下,是不符合证书路径的

1
2
~ strings /data/app/taf/tafnode/data/LEAF.ServerLessNode/data/ScriptEngineServerBin/817186/libcrypto.so.1.1|grep OPENSSLDIR
OPENSSLDIR: "/usr/local/ssl"

直接linux上运行则依赖/lib/x86_64-linux-gnu/libcrypto.so.1.1

1
2
~ strace python3 test.py 2>&1|grep crypto
openat(AT_FDCWD, "/lib/x86_64-linux-gnu/libcrypto.so.1.1", O_RDONLY|O_CLOEXEC) = 3

它的编译参数如下,是符合证书路径的

1
2
strings /lib/x86_64-linux-gnu/libcrypto.so.1.1|grep OPENSSLDIR
OPENSSLDIR: "/usr/lib/ssl"

替换python依赖的ssl动态库来验证猜想

1
2
3
4
5
6
7
8
9
10
11
12
13
14
15
16
17
18
19
20
21
22
23
24
25
26
27
import ctypes

library_path = "/lib/x86_64-linux-gnu/libcrypto.so.1.1"
ctypes.cdll.LoadLibrary(library_path)

library_path = "/lib/x86_64-linux-gnu/libssl.so.1.1"
ctypes.cdll.LoadLibrary(library_path)

import ssl
import socket
import asyncio

async def test_ssl() -> int :
hostname = "oss-cn-shenzhen.aliyuncs.com"
port = 443
context = ssl.create_default_context()

with socket.create_connection((hostname, port)) as sock:
with context.wrap_socket(sock, server_hostname=hostname) as ssl_sock:
cert = ssl_sock.getpeercert()
tls_version = ssl_sock.version()

print("SSL Certificate: ", cert)
print("TLS Version: ", tls_version)
return 0

asyncio.get_event_loop().run_until_complete(test_ssl())

经过平台的sdk适配后,成功执行!

解决问题

刚才替换的ssl动态库,不能直接用来解决问题

因为20.04上自带的ssl动态库,依赖了高版本libc的符号,如果Serverless平台直接使用这个动态库,会导致在16.04上无法运行

而16.04自带的ssl动态库,则版本号太低了

1
2
~ openssl version -v
OpenSSL 1.0.2g 1 Mar 2016

这个版本不支持TLS 1.3

所以需要在16.04上自己编译一个动态库版本

查看20.04上的安装版本,编译出完全一致的即可

1
2
3
4
5
6
7
8
9
~ openssl version -a
OpenSSL 1.1.1f 31 Mar 2020
built on: Tue Oct 10 09:03:48 2023 UTC
platform: debian-amd64
options: bn(64,64) rc4(16x,int) des(int) blowfish(ptr)
compiler: gcc -fPIC -pthread -m64 -Wa,--noexecstack -Wall -Wa,--noexecstack -g -O2 -fdebug-prefix-map=/build/openssl-Wyyo9w/openssl-1.1.1f=. -fstack-protector-strong -Wformat -Werror=format-security -DOPENSSL_TLS_SECURITY_LEVEL=2 -DOPENSSL_USE_NODELETE -DL_ENDIAN -DOPENSSL_PIC -DOPENSSL_CPUID_OBJ -DOPENSSL_IA32_SSE2 -DOPENSSL_BN_ASM_MONT -DOPENSSL_BN_ASM_MONT5 -DOPENSSL_BN_ASM_GF2m -DSHA1_ASM -DSHA256_ASM -DSHA512_ASM -DKECCAK1600_ASM -DRC4_ASM -DMD5_ASM -DAESNI_ASM -DVPAES_ASM -DGHASH_ASM -DECP_NISTZ256_ASM -DX25519_ASM -DPOLY1305_ASM -DNDEBUG -Wdate-time -D_FORTIFY_SOURCE=2
OPENSSLDIR: "/usr/lib/ssl"
ENGINESDIR: "/usr/lib/x86_64-linux-gnu/engines-1.1"
Seeding source: os-specific

那么我也需要用1.1.1f来编译

1
2
3
4
wget https://www.openssl.org/source/openssl-1.1.1f.tar.gz --no-check-certificate
tar xvf openssl-1.1.1f.tar.gz
cd openssl-1.1.1f
CFLAGS="-Wall -Wa,--noexecstack -g -O2 -fdebug-prefix-map=/build/openssl-ANcB0E/openssl-1.1.1f=. -fstack-protector-strong -Wformat -Werror=format-security" ./config --prefix=/usr/lib/x86_64-linux-gnu --openssldir=/usr/lib/ssl -DOPENSSL_TLS_SECURITY_LEVEL=2 -Wdate-time -D_FORTIFY_SOURCE=2

先别急着make,直接make出来的ENGINESDIR会是/usr/lib/x86_64-linux-gnu/lib/engines-1.1,简单修改下Makefile

1
2
3
4
5
6
7
INSTALLTOP=/usr/lib/x86_64-linux-gnu
OPENSSLDIR=/usr/lib/ssl
LIBDIR=lib
# $(libdir) is chosen to be compatible with the GNU coding standards
libdir=$(INSTALLTOP)/$(LIBDIR)
# ENGINESDIR=$(libdir)/engines-1.1改成
ENGINESDIR=$(INSTALLTOP)/engines-1.1

保存然后make,这里有个重点

不能make -j,因为早期版本的openssl还没有多核电脑,因此不支持多线程编译

1
~ make

由于我只需要动态库,不打算make install,因此编译出的openssl的二进制需要patchelf一下

1
2
3
4
5
6
7
8
9
~ patchelf --set-rpath . apps/openssl
~ ldd apps/openssl
linux-vdso.so.1 => (0x00007ffec518c000)
libssl.so.1.1 => ./libssl.so.1.1 (0x00007f4b995c2000)
libcrypto.so.1.1 => ./libcrypto.so.1.1 (0x00007f4b9916e000)
libpthread.so.0 => /lib/x86_64-linux-gnu/libpthread.so.0 (0x00007f4b98f51000)
libc.so.6 => /lib/x86_64-linux-gnu/libc.so.6 (0x00007f4b98b87000)
libdl.so.2 => /lib/x86_64-linux-gnu/libdl.so.2 (0x00007f4b98983000)
/lib64/ld-linux-x86-64.so.2 (0x00007f4b9942d000)

然后看下编译结果的版本,其中的compiler调换顺序,就和20.04自带的openssl的编译选项一毛一样辣~

1
2
3
4
5
6
7
8
9
~ ./apps/openssl version -a
OpenSSL 1.1.1f 31 Mar 2020
built on: Tue Sep 3 19:37:17 2024 UTC
platform: linux-x86_64
options: bn(64,64) rc4(16x,int) des(int) idea(int) blowfish(ptr)
compiler: gcc -fPIC -pthread -m64 -Wa,--noexecstack -Wall -Wa,--noexecstack -g -O2 -fdebug-prefix-map=/build/openssl-ANcB0E/openssl-1.1.1f=. -fstack-protector-strong -Wformat -Werror=format-security -Wdate-time -DOPENSSL_USE_NODELETE -DL_ENDIAN -DOPENSSL_PIC -DOPENSSL_CPUID_OBJ -DOPENSSL_IA32_SSE2 -DOPENSSL_BN_ASM_MONT -DOPENSSL_BN_ASM_MONT5 -DOPENSSL_BN_ASM_GF2m -DSHA1_ASM -DSHA256_ASM -DSHA512_ASM -DKECCAK1600_ASM -DRC4_ASM -DMD5_ASM -DAESNI_ASM -DVPAES_ASM -DGHASH_ASM -DECP_NISTZ256_ASM -DX25519_ASM -DPOLY1305_ASM -DNDEBUG -DOPENSSL_TLS_SECURITY_LEVEL=2 -D_FORTIFY_SOURCE=2
OPENSSLDIR: "/usr/lib/ssl"
ENGINESDIR: "/usr/lib/x86_64-linux-gnu/engines-1.1"
Seeding source: os-specific

将ssl.so和crypto.so打入Serverless平台的引擎中,azure的speechsdk成功执行!

完结撒花!

总结

python依赖的openssl动态库,它的编译参数OPENSSLDIR一定要和机器上的证书实际目录一致

如果不一致,可以通过以下方法解决:

  • load_verify_locations手动指定证书

    对于已经封装好的sdk,例如azure的speechsdk,由于没有暴露ssl.SSLContext,无法使用这种办法

  • 此时可以通过覆盖SSL_CERT_FILE和SSL_CERT_DIR的环境变量来解决

  • 也可以通过ctypes包,强制修改依赖的ssl库来解决