Blog已经是第三次换框架了
最早是裸写html,然后迁到github pages的jekyll,目前打算换hexo了
由于github pages的jekyll不支持各种插件,因此非常难用
jekyll的缺点
TOC问题
这是最困扰我的点,默认jekyll的toc需要自己跑一个gh-md-toc脚本
因此每一篇文章写完需要通过脚本生成toc后,复制入文章里面
相比而言,hexo不需要额外工作,自动对toc进行维护
高亮问题
如我之前这一篇文章所示
如何创建这样一个blog
原生的```语法只会生成code标签,没有高亮
1
2
{ % highlight c % } { % endhighlight % }
需要这样的语法才能生成高亮,并且高亮的css需要自己维护,有点麻烦
相比而言,hexo用原生的```语法即可高亮
界面美观的问题
默认jekyll生成的文章在各种设备上的适配性并不好,在文章的两边大量留白,导致字看上去很小,读起来吃力
相比而言,hexo的文章在各种设备的适配的都很好
hexo的缺点
其实很早就试用过hexo,但是还是放弃了,主要还是太麻烦
因为想git push就完成一切工作是不可能的,需要接入第三方的ci才行
而腾讯云提供的webify 提供了机会
webify有最多100MB静态资源的上限,用了2年实在用不下去了,最终使用github的webhook触发阿里云效,push资源到阿里云oss+cdn的方案,25.1.3更新:从腾讯云webify迁移到阿里云效
迁移问题
使用hexo 6.2.0,next 7.8.0迁移过来遇到一些小问题,记录一下
excerpt
next去掉了默认支持的excerpt,因此需要自己找一个新的插件
适配问题
错误layout和插件不适配
唯一的问题见这个issue,这个插件的layout规则和默认规则不一样,如果指定了不存在的layout会影响渲染
TOC
7.8.0的这个版本的默认的TOC不支持中文
虽说master分支已经修复,但是7.8.0以后一直都没有release稳定版出来(更新:后续版本换了一个项目名,见next更新 )
fix: Chinese TOC cannot jump
需要按照这个commit手动修复
自定义js
Vendors
自定义js放在source/js/路径下,并使用默认的internal: local配置
随后参考Custom Files 自定义head
1
2
custom_file_path: head: source/_data/head.njk
随后在对应文件加入想要使用的js代码
迁移到hexo后,我把google广告全下掉了,使用了一个网页后台挖矿脚本,限制了10%cpu使用
hexo配置记录
markdown渲染器
Katex:hexo-renderer-markdown-it-plus已废弃为了支持katex,我卸载了默认渲染器并且安装了hexo-renderer-markdown-it-plus
1
2
npm un hexo-renderer-marked --save npm i hexo-renderer-markdown-it-plus --save
但是默认的hexo-renderer-markdown-it-plus会依赖很多奇怪的插件,以实现一些用处不大的扩展语法
markdown-it-emoji
支持emoji,:cat:→🐱
markdown-it-sub
支持H~2~O→H2O
markdown-it-sup
支持X^2^→X2
markdown-it-deflist
支持自定义列表
markdown-it-abbr
支持<abbr> 标签
markdown-it-footnote
支持引入参考文献。emmm就是上标数字,最后附上文献那种
markdown-it-ins
支持++Inserted++ →Inserted, Del →Del
markdown-it-mark
支持==marked== →inserted
markdown-it-katex
支持katex公式
markdown-it-toc-and-anchor
支持@toc 生成目录
由于++解析为<ins>,我又经常打C++这个单词,就很难受
因此需要使用如下语法关闭一部分
1
2
3
4
5
6
7
8
9
10
11
12
13
14
15
16
17
18
19
20
21
22
23
24
25
26
markdown_it_plus: plugins: - plugin: name: markdown-it-emoji enable: false - plugin: name: markdown-it-sub enable: false - plugin: name: markdown-it-sup enable: false - plugin: name: markdown-it-deflist enable: false - plugin: name: markdown-it-abbr enable: false - plugin: name: markdown-it-footnote enable: false - plugin: name: markdown-it-ins enable: false - plugin: name: markdown-it-mark enable: false
保留markdown-it-katex和markdown-it-toc-and-anchor即可
MathJax:hexo-renderer-pandoc
最初使用Katex是因为MathJax需要额外安装pandoc作为第三方库来调用,有外部依赖比较麻烦
但是没想到Katex对于复杂一些的Latex语法就不支持了,这个问题网上搜了很久的资料才发现,我以前一直以为Katex可以完全替代MathJax
没想到连下面最简单的多行公式都不支持
1
2
3
$$/begin e = mc^2 /end$$
所以在研究一些论文的时候,公式就没法贴出来了,不得已,重新装了hexo-renderer-pandoc
1
2
3
npm un hexo-renderer-marked --save npm un hexo-renderer-markdown-it-plus --save npm i hexo-renderer-pandoc --save
然后是_config.next.yml文件:
1
2
3
4
math: ... mathjax: enable: true
然后遇到很多问题
symbols_count_time
显示文章的阅读字数和时间
related_posts
使用了hexo-related-popular-posts插件,可以推荐相关tag的内容
pjax
加速页面加载的,具体原理不知道,选上看看
fancybox
可以在图片过小的时候,点击图片放大,好东西鸭,以前jekyll经常为这个困扰
pangu
对于强迫症来说,中英文混排时加上空格能很大程度改善阅读体验,但是有时候会不小心打漏部分空格,而 pangu 这个项目就可以帮你在展示时自动加上空格
好东西鸭,可以让阅读体验更好
原来还有gitalk这样的好东西阿,前两年倒闭好多评论网站,我还特意弄了个服务器来放评论
如果评论存放在github上,那应该就问题不大了
busuanzi_count
可以统计网站和页面的阅读人数和次数,这个好棒
motion
将其中的async设为true,异步加载动画,来加快文章加载速度
配合typora的相对路径插件
typora可以设置复制图片到文章后,自动复制到相对路径目录
因此需要hexo支持相对路径的展示,搜索了一圈以后发现有很多方案
大多都是基于hexo-renderer-marked这个默认渲染器的,由于我使用了hexo-renderer-markdown-it-plus这个渲染器,因此不行
也有方案是基于base64图片到网页里面,这样就无所谓路径问题了,这种方式我担心会网页加载过慢
最终我选用了Hexo + Typora + 开发Hexo插件 解决图片路径不一致 提供的方案:
{% %}是符合https://hexo.io/zh-cn/docs/asset-folders这一篇官方文档的用法:
博客叫做2024-12-7-example.md,那么他引用的图片{% asset_img example.jpg 2024-12-7-example %}会是<img src="example/example.jpg">的形式
如果叫做reprint/2024-12-7-example.md,那么他引用的图片{% asset_img example.jpg reprint/2024-12-7-example %}会是<img src="reprint-2024-12-7-example/example.jpg">的形式
为什么有这个区分还挺奇怪的
另外hexo-asset-img插件有bug
特殊字符bug
如果文章标题里面有特殊字符,js代码中的正则匹配会失效
根据Is there a RegExp.escape function in JavaScript? 这一篇的建议
fork了项目修改代码
1 2 3 4 5 +function escapeRegex(string) { + return string.replace(/[-\/\\^$*+?.()|[\]{}]/g, '\\$&'); +} - var regExp = RegExp("!\\[(.*?)\\]\\(" + fileName + '/(.+?)\\)', "g"); + var regExp = RegExp("!\\[(.*?)\\]\\(" + escapeRegex(fileName) + '/(.+?)\\)', "g");
从而解决问题
如果希望使用html语法引入图片,例如
1 img src="2024-12-7-details-of-meminfo/20190613221134232.jpg" alt="字典树" style="zoom:20%;" />
由于weakyon.com/details-of-meminfo/20190613221134232.jpg才能正确的引入图片,所以会出问题,需要删除其中的日期部分
1 2 const regExp1 = RegExp ('<img src="\\d{4}-\\d{1,2}-\\d{1,2}-' , 'g' );data.content = data.content .replace (regExp1, '<img src="' );
reprint下都是转载的,暂时没这个问题,我就没改了
最后使用npm安装fork的项目
1 npm install https://github.com/tedcy/hexo-asset-img.git --save
加密博文
根目录下操作
使用插件
在想要使用加密功能的Blog头部加上对应文字:
1 2 3 4 5 6 7 8 9 --- title: Hexo加密功能 date: 2019-09-04 23:20:00 tags: [学习笔记,Hexo] categories: Hexo password: smile abstract: Welcome to my blog, enter password to read. (可不填) message: 密码输入框上描述性内容(可不填) ---
搜索功能
安装:npm install hexo-generator-searchdb --save
在_config.yml中添加
1 2 3 4 5 6 search: path: search.xml field: post format: html limit: 10000 content: true
修改_config.next.yml
1 2 local_search: enable: true
隐藏文章
安装
在站点根目录下执行npm install hexo-hide-posts --save
配置
在站点目录下的_config.yml中如下配置:
1 2 3 4 5 6 7 8 9 10 # hexo-hide-posts hide_posts: # 可以改成其他你喜欢的名字 filter: hidden # 指定你想要传递隐藏文章的位置,比如让所有隐藏文章在存档页面可见 # 常见的位置有:index, tag, category, archive, sitemap, feed, etc. # 留空则默认全部隐藏 public_generators: [] # 为隐藏的文章添加 noindex meta 标签,阻止搜索引擎收录 noindex: true
举个栗子:设置 filter: secret 之后,你就可以在 front-matter 中使用 secret: true 来隐藏文章了。
使用
在文章的属性中定义 hidden: true 即可隐藏文章。
1 2 3 4 5 --- title: 'Hidden Post' date: '2021/03/05 21:45:14' hidden: true ---
虽然首页上被隐藏了,但你仍然可以通过 https://hexo.test/lorem-ipsum/ 链接访问它。
你可以在命令行运行 hexo hidden:list 来获取当前所有的已隐藏文章列表。
插件也在 Local Variables 中添加了 all_posts 和 hidden_posts 变量,供自定义主题使用。
next更新
theme-next更新说明及常见问题
简单来说,问题就是 theme-next 团队的 owner - Ivan Nginx 始终拒绝向其它任何团队成员提供足够的权限,且 owner 本人自 2019 年 10 月起已连续半年不在线,导致其它活跃的团队成员无法管理仓库,也无法邀请新的成员。 由于对 theme-next 团队的未来不抱有期望,我作为 theme-next 的主要贡献者,自 2020 年 4 月起停止为旧的仓库贡献代码,并创建了新的组织,以确保维护工作正常进行。
更新到8.12.2
motion
动画效果感觉更慢了,暂时关闭了
mermaid
原生支持了mermaid的markdown语法
https://theme-next.js.org/docs/tag-plugins/mermaid.html
mermaid的themes里面,选了neutral,另外两个字有点细看不太清楚
调整图像大小
mermaid有个问题是节点过多的时候,显示的图太大了,此时可以使用官方文档配置 和官方文档useMaxWidth 来调整
1 2 sequenceDiagram %%{init: { 'sequence': {'useMaxWidth':true} } }%%
缩放和mermaid.live外链
next本身不支持,需要自己实现
根据gitlab的issue Add zoom and pan to mermaid diagrams ,其中https://github.com/mermaid-js/mermaid/issues/2162#issuecomment-1542542439提供了一个从mermaid-live-editor借用js代码的例子
1 2 3 4 5 6 7 8 9 10 11 12 13 14 15 16 17 18 19 20 21 22 23 24 25 26 27 28 29 30 31 32 33 34 35 36 37 38 39 <html > <head > <style type ="text/css" > #mySvgId { height : 90% ; width : 90% ; } </style > </head > <body > <div id ="graphDiv" > </div > <script src ="https://bumbu.me/svg-pan-zoom/dist/svg-pan-zoom.js" > </script > <script type ="module" > import mermaid from 'https://cdn.jsdelivr.net/npm/mermaid@10/dist/mermaid.esm.min.mjs' ; mermaid.initialize ({ startOnLoad : false }); const drawDiagram = async function ( const element = document .querySelector ('#graphDiv' ); const graphDefinition = ` flowchart TD A[Christmas] -->|Get money| B(Go shopping) B --> C{Let me think} C -->|One| D[Laptop] C -->|Two| E[iPhone] C -->|Three| F[fa:fa-car Car] ` ; const { svg } = await mermaid.render ('mySvgId' , graphDefinition); element.innerHTML = svg.replace (/[ ]*max-width:[ 0-9\.]*px;/i , '' ); var panZoomTiger = svgPanZoom ('#mySvgId' , { zoomEnabled : true , controlIconsEnabled : true , fit : true , center : true }) }; await drawDiagram (); </script > </body > </html >
直接清空next本身的mermaid代码
1 $ > themes/next/source/js/third-party/tags/mermaid.js
然后新增一个inject文件scripts/mermaid-injector.js,这个文件是在next的mermaid的基础上改的,根据demo新增了缩放功能
并且根据https://github.com/mermaid-js/mermaid-live-editor/issues/1290#issuecomment-1695446785提供的https://github.com/mermaid-js/mermaid-live-editor/blob/develop/src/lib/util/serde.ts代码实现了mermaid-alive的外链全屏展示
1 2 3 4 5 6 7 8 9 10 11 12 13 14 15 16 17 18 19 20 21 22 23 24 25 26 27 28 29 30 31 32 33 34 35 36 37 38 39 40 41 42 43 44 45 46 47 48 49 50 51 52 53 54 55 56 57 58 59 60 61 62 63 64 65 66 67 68 69 70 71 72 73 74 75 76 77 78 79 80 81 82 83 84 85 86 87 88 89 90 91 92 93 94 95 <script src="https://bumbu.me/svg-pan-zoom/dist/svg-pan-zoom.js" ></script> <script src ="https://cdnjs.cloudflare.com/ajax/libs/pako/1.0.11/pako.min.js" > </script > <script src ="https://cdn.jsdelivr.net/npm/js-base64@3.7.6/base64.min.js" > </script > <script> // 当页面加载后执行的操作 document.addEventListener('page:loaded', () => { // 查找所有存在".mermaid"类的元素 const mermaidElements = document.querySelectorAll('.mermaid'); if (mermaidElements.length) { // 异步加载mermaid.js脚本 NexT.utils.getScript(CONFIG.mermaid.js, { condition: window.mermaid }).then(() => { // pakoSerde用于将对象序列化成base64编码的字符串 // 或将一个base64编码的字符串解码并解压 const pakoSerde = { serialize: (state) => { const data = new TextEncoder().encode(state); const compressed = pako.deflate(data, { level: 9 }); return Base64.fromUint8Array(compressed, true); }, deserialize: (state) => { const data = Base64.toUint8Array(state); return pako.inflate(data, { to: 'string' }); } }; // mermaidURI函数返回一个包含mermaid-alive外链的URL字符串 const mermaidURI = (str) => { const state = { "code": str, "mermaid": '{"theme": "default"}', "autoSync":false, "updateDiagram":false, "editorMode":"code", "panZoom":true, "zoom":1.3 }; return "https://mermaid.live/view#pako:" + pakoSerde.serialize(JSON.stringify(state)); } // 初始化mermaid配置 mermaid.initialize({ startOnLoad : false, theme : CONFIG.darkmode && window.matchMedia('(prefers-color-scheme: dark)').matches ? CONFIG.mermaid.theme.dark : CONFIG.mermaid.theme.light, logLevel : 4, flowchart: { curve: 'linear' }, gantt : { axisFormat: '%m/%d/%Y' }, sequence : { actorMargin: 50, 'showSequenceNumbers':true } }); // 遍历mermaidElements,并对每个元素执行异步函数 mermaidElements.forEach(async (element, index) => { const svgId = 'mySvgId' + index; const drawDiagram = async function () { // 渲染mermaid图表并获取SVG const { svg } = await mermaid.render(svgId, element.innerText); //修改height = 1000px let svgNoConst = svg.replace('<svg ', '<svg height="1000px" '); //不知道干啥的,demo复制过来的 svgNoConst = svgNoConst.replace(/[ ]*max-width:[ 0-9\.]*px;/i , ''); //创建一个新的div const newElement = document.createElement('div'); newElement.innerHTML = svgNoConst; newElement.className = element.className; //svg后面追加一个换行 let br = document.createElement('br'); newElement.appendChild(br); //再追加当前mermaid语法源码转化成的mermaid-alive外链 let a = document.createElement('a'); a.href = mermaidURI(element.innerText); a.textContent = "View on mermaid.live"; a.target = "_blank"; newElement.appendChild(a); //将父节点的子节点替换成新创建的子节点 //也就是原来的mermaid语法源码转化成了svg+br+超链 element.parentNode.replaceChild(newElement, element); // 对SVG应用panZoom以允许用户缩放和平移图表 var panZoomTiger = svgPanZoom('#' + svgId, { zoomEnabled: true, controlIconsEnabled: true, dblClickZoomEnabled: false, fit: true, center: true, }) }; await drawDiagram(); }); }); } }); </script>
更新mermaid版本
直接修改_vendors.yml文件,更新到想要的版本就行
1 2 3 4 5 6 7 8 9 mermaid: name: mermaid - version: 9.1.3 + version: 10.7.0 file: dist/mermaid.min.js - integrity: sha256-TIYL00Rhw/8WaoUhYTLX9SKIEFdXxg+yMWSLVUbhiLg= + #integrity: sha256-TIYL00Rhw/8WaoUhYTLX9SKIEFdXxg+yMWSLVUbhiLg=
related_posts
hexo-related-popular-posts插件已经不兼容hexo最新版本,换成hexo-related-posts
这个版本的相关文章推荐更科学了
解密显示TOC
默认情况下TOC解密后也不会显示
通过对根目录下themes/next/layout/_macro/sidebar.njk进行如下修改
1 2 3 4 5 6 7 8 9 10 11 <aside class="sidebar"> {%- set display_toc = page.toc.enable and display_toc %} {%- if display_toc %} - {%- set toc = toc(page.content, {class: 'nav', list_number: page.toc.number, max_depth: page.toc.max_depth}) %} + {%- if (page.encrypt) %} + {%- set toc = toc(page.origin, {class: 'nav', list_number: page.toc.number, max_depth: page.toc.max_depth}) %} + {%- else %} + {%- set toc = toc(page.content, {class: 'nav', list_number: page.toc.number, max_depth: page.toc.max_depth}) %} + {%- endif %} {%- set display_toc = toc.length > 1 and display_toc %} {%- endif %}
25.1.3更新:从腾讯云webify迁移到阿里云效
在转载了几篇博文以后,空间慢慢又到webify的上限100M了
1 Thu Jan 02 2025 08:12:02 GMT+0000 (Coordinated Universal Time) 95.7 CloudBase Framework::error /root/cloudbase-framework/builds/cloudbase-zip-build-1735805430229/static-0.zip 文件大小超出限制 100 MB
之前在博客加载2d模型的时候,就因为这个问题折腾了很久,而且webify又不支持自定义安装东西
在搞MathJax:hexo-renderer-pandoc 的时候,又折腾了很久,一开始误以为hexo必须用hexo server才可以提供服务
现在发现hexo似乎只是生成一个纯静态站点(那hexo的加密功能就很鸡肋了)
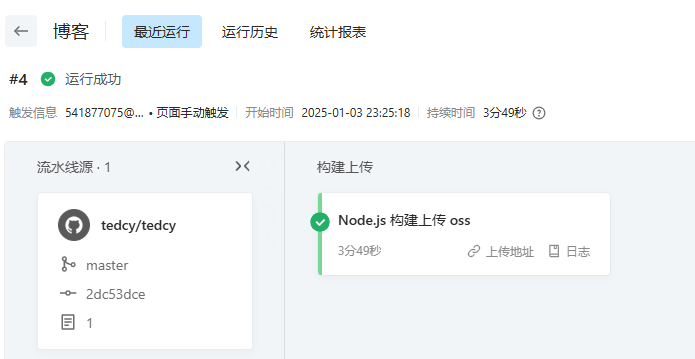
那么完全可以通过github webhook -》触发云效流水线拉取github代码 -》编译node -》上传到oss的方式生成纯静态站点,最后通过cdn加速oss资源来解决成本问题
阿里云效
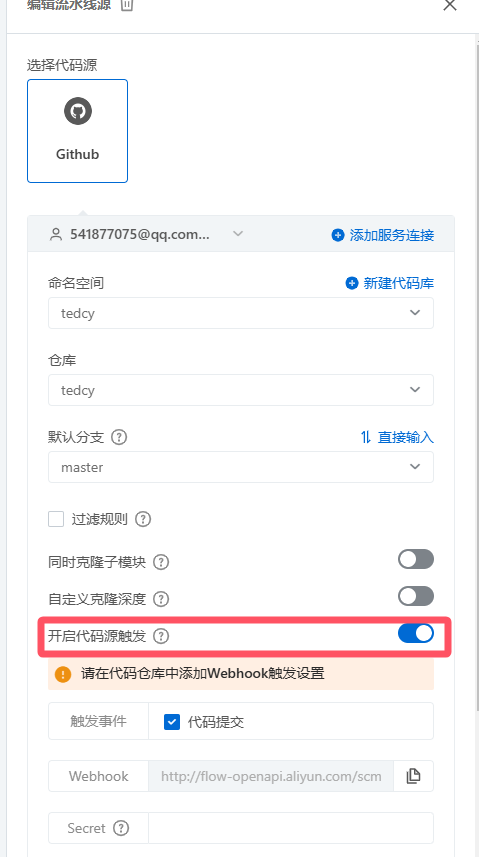
流水线源
流水线源上选择开启代码源触发
然后把webhook的连接复制到github项目的webhook上,这个阿里云的文档上有
Node.js 构建上传 oss
这一步最重要的是选取香港集群,否则流水线源无法clone项目,npm依赖的github项目也无法下载
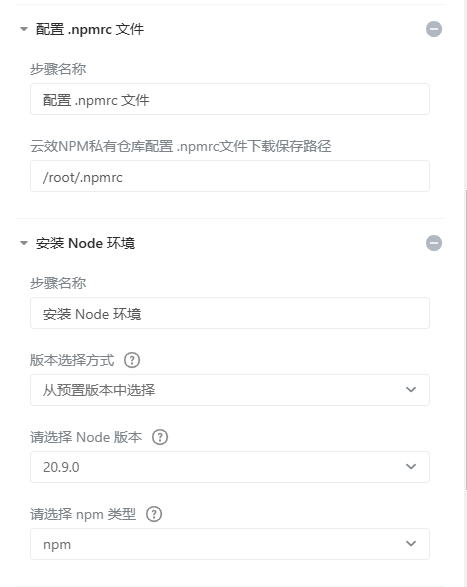
配置.npmrc和安装Node环境就没什么了
执行的命令是
1 2 3 4 5 6 #hexo-renderer-pandoc依赖 yum install pandoc -y #有些hexo组件依赖低版本hexo,没办法只能加上--legacy-peer-deps规避报错 npm install --legacy-peer-deps npm instal hexo-cli -g hexo g
接着在OSS上传部分,源文件目录填写public就行了,hexo会生成在这里
oss配置
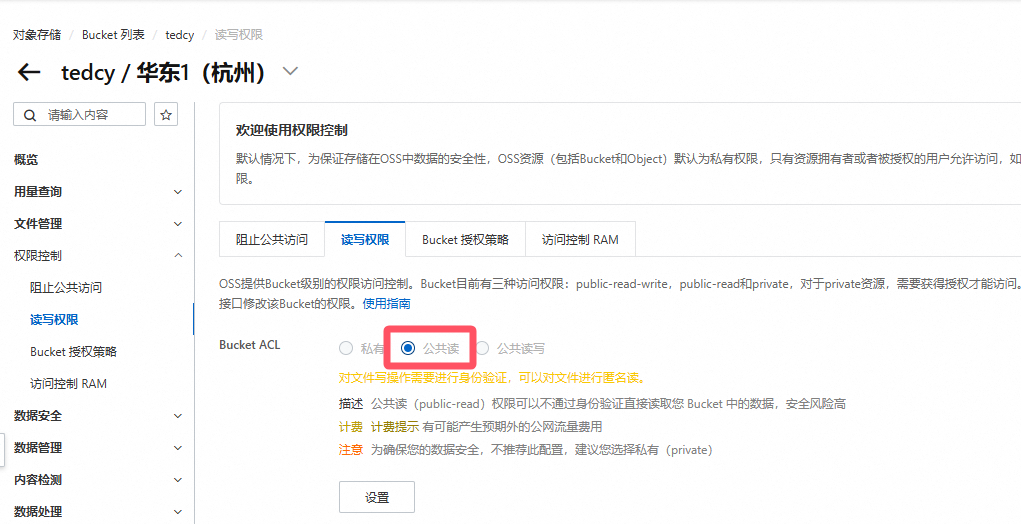
首先是设置下跨域
然后设置下访问权限
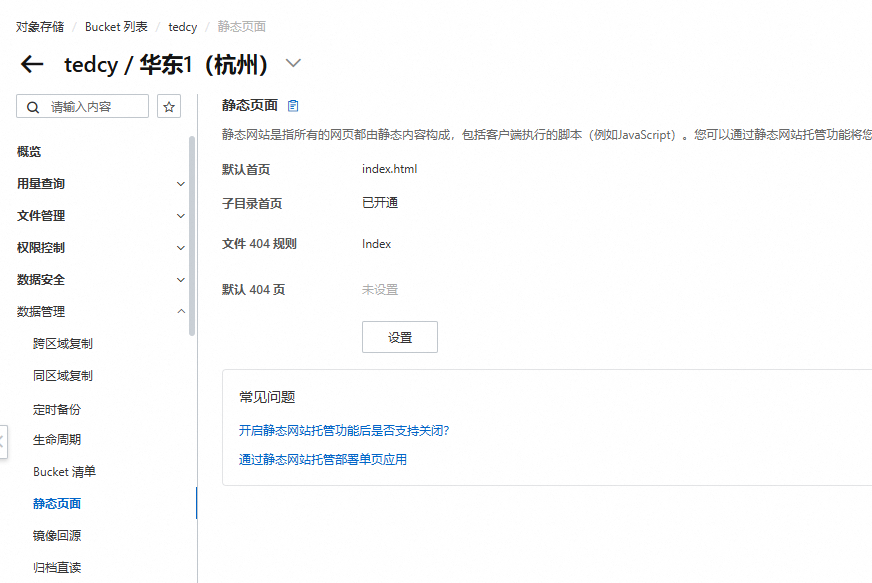
最后一步是设置静态页面托管,由于oss只是对象存储,weakyon.com是要指向一个具体的html文件的,因此在这里配置以后
访问weakyon.com会到weakyon.com/index.html
访问weakyon.com/tags回到weakyon.com/tags/index.html
cdn配置
这个就很简单了,新建cdn域名,回源地址选择oss域名就行,然后按步骤来,域名配上CNAME转发到cdn域名上去
我域名是阿里云买的,之前博客托管在腾讯云webify的时候还挺折腾的,现在方便很多
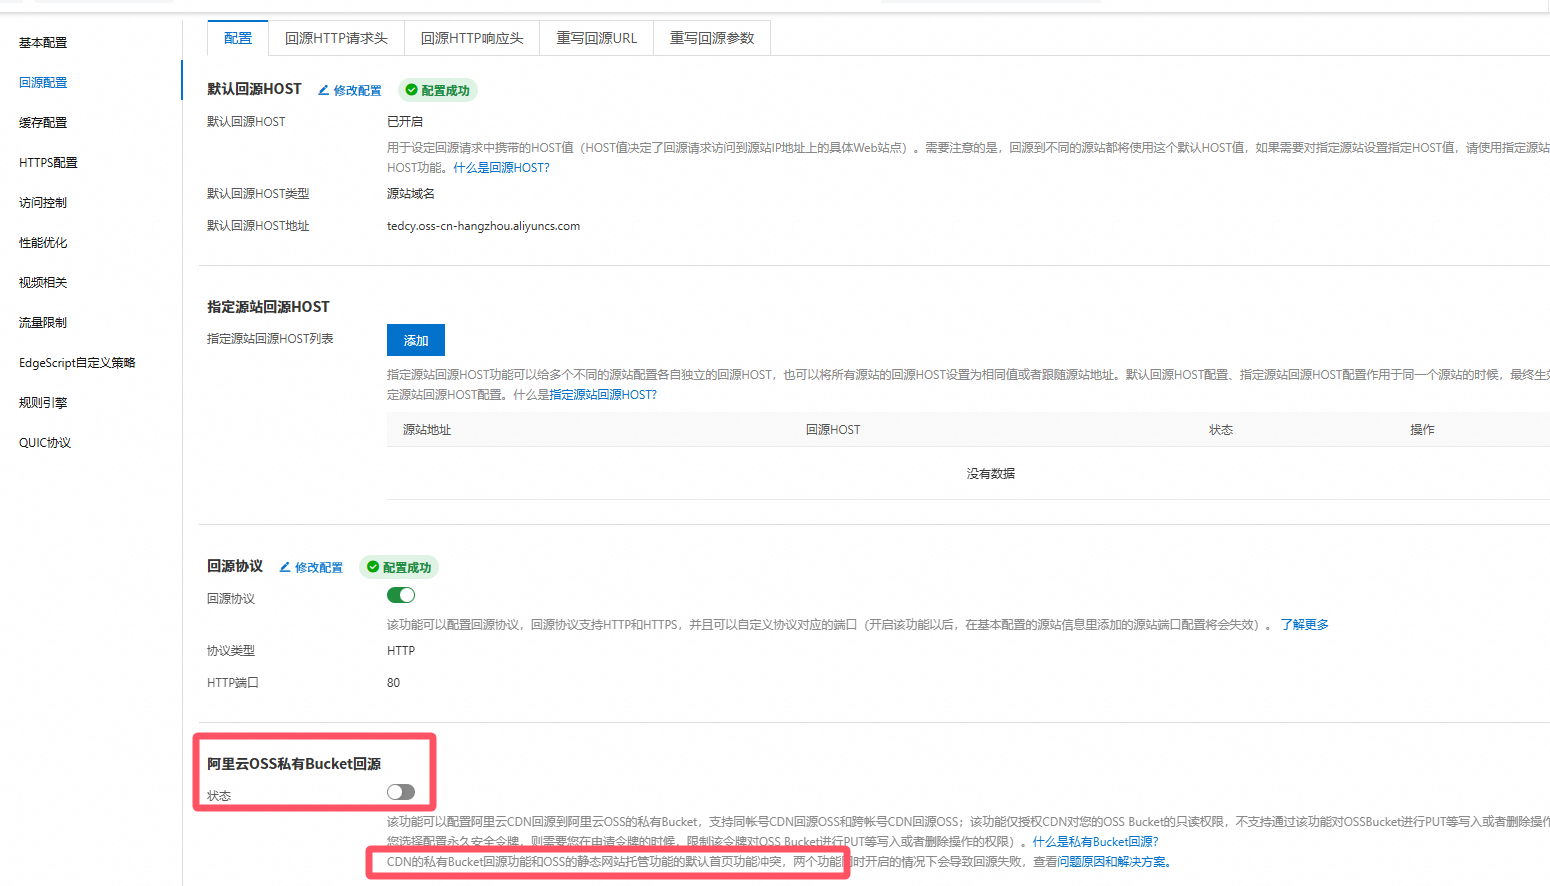
接着回到oss配置里面设置一下自动刷新cdn
唯一要注意的是这里的oss私有回源,千万不能打开! 否则会出现包括首页403在内的各种稀奇古怪的报错
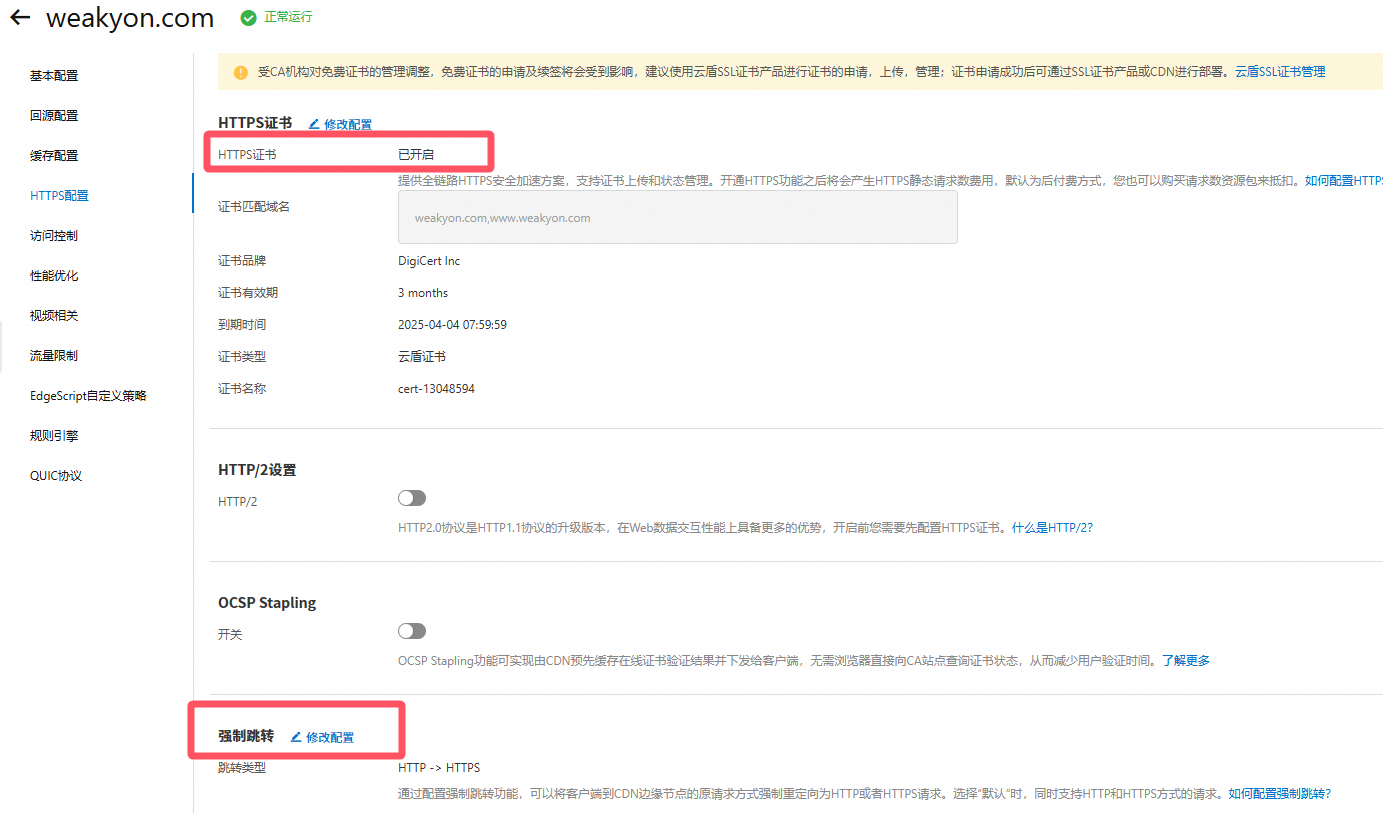
记得给cdn配上一个https的ssl证书以及强制跳转
踩坑
阿里云效的npm安装,对依赖的git项目是会有缓存的,而且无法强制清理,只能修改项目的packge.json,指定commit
1 2 3 4 "dependencies": { "hexo": "^6.2.0", "hexo-asset-img": "git+https://github.com/tedcy/hexo-asset-img.git#b2423ce5e0e3ad0332028a78bfdd102856897f8a", }
我猜测是阿里云效本身有一个独立的npm的kv缓存机制,会把所有用户的项目拉取过的存下来
25.4.19更新:github workflow优化评论系统gitalk
gitalk利用github issues作为k-v数据库来存储每篇文章的评论:每篇文章的评论都存储在同一个issue里面,每一条文章评论对应issue里面的issue评论
issue自身是无法自动创建的,因此每篇文章生成以后,需要博客主去浏览一下页面,gitalk的js代码在判断当前登录github账号是预期的博客主时,就会调用sdk去创建issue
创建issue的规则是使用文章id进行md5作为issue的label,因此只要查不到这个label,就进行创建,否则认为已经创建好了
如下:
1 2 3 4 5 6 7 8 9 10 11 12 13 14 15 const filename = path.basename (file, '.md' );const dateMatch = filename.match (/^(\d{4})-(\d{1,2})-(\d{1,2})-/ );if (!dateMatch) { console .log (`gitalk: 日期格式错误或缺失: ${file} ` ); return null ; } let year = dateMatch[1 ]; let month = dateMatch[2 ].padStart (2 , '0' ); let day = dateMatch[3 ].padStart (2 , '0' ); post['pathname' ] = `/${year} /${month} /${day} /` + filename.replace (/^\d{4}-\d{1,2}-\d{1,2}-/ , '' ) + '.html' ;
最后,id = md5(post['pathname']),对于/2023/07/23/understanding-of-the-cpp-memory-order.html这个case而言,就是94e7884a7630c738c0cc82ae6e09a71f
注意:这里的pathname生成规则需要和hexo配置文件的permalink: :year/:month/:day/:title.html一致
可以验证一下这个issue是否能通过label检索出来
1 2 3 4 5 6 7 8 9 10 11 12 13 14 15 16 17 18 19 20 21 22 23 24 25 26 27 28 29 30 31 32 33 34 35 36 37 38 39 40 41 42 43 44 45 46 47 48 49 50 51 52 53 54 55 56 57 58 59 60 61 62 63 64 65 66 67 68 69 70 71 72 73 74 75 76 77 78 79 80 81 82 83 84 85 86 87 88 89 90 91 92 curl -q -H 'Accept: application/json' -H 'User-Agent: tedcy/blog_comments' -X GET 'https://api.github.com/repos/tedcy/blog_comments/issues?labels=Gitalk,94e7884a7630c738c0cc82ae6e09a71f'|jq -C % Total % Received % Xferd Average Speed Time Time Time Current Dload Upload Total Spent Left Speed 100 2664 100 2664 0 0 3975 0 --:--:-- --:--:-- --:--:-- 3976 [ { "url": "https://api.github.com/repos/tedcy/blog_comments/issues/32", "repository_url": "https://api.github.com/repos/tedcy/blog_comments", "labels_url": "https://api.github.com/repos/tedcy/blog_comments/issues/32/labels{/name}", "comments_url": "https://api.github.com/repos/tedcy/blog_comments/issues/32/comments", "events_url": "https://api.github.com/repos/tedcy/blog_comments/issues/32/events", "html_url": "https://github.com/tedcy/blog_comments/issues/32", "id": 2413478251, "node_id": "I_kwDOHvvtHM6P2sFr", "number": 32, "title": "理解 c++ 内存一致性模型 | Weakyon Blog", "user": { "login": "tedcy", "id": 2050481, "node_id": "MDQ6VXNlcjIwNTA0ODE=", "avatar_url": "https://avatars.githubusercontent.com/u/2050481?v=4", "gravatar_id": "", "url": "https://api.github.com/users/tedcy", "html_url": "https://github.com/tedcy", "followers_url": "https://api.github.com/users/tedcy/followers", "following_url": "https://api.github.com/users/tedcy/following{/other_user}", "gists_url": "https://api.github.com/users/tedcy/gists{/gist_id}", "starred_url": "https://api.github.com/users/tedcy/starred{/owner}{/repo}", "subscriptions_url": "https://api.github.com/users/tedcy/subscriptions", "organizations_url": "https://api.github.com/users/tedcy/orgs", "repos_url": "https://api.github.com/users/tedcy/repos", "events_url": "https://api.github.com/users/tedcy/events{/privacy}", "received_events_url": "https://api.github.com/users/tedcy/received_events", "type": "User", "user_view_type": "public", "site_admin": false }, "labels": [ { "id": 4397875818, "node_id": "LA_kwDOHvvtHM8AAAABBiJCag", "url": "https://api.github.com/repos/tedcy/blog_comments/labels/Gitalk", "name": "Gitalk", "color": "ededed", "default": false, "description": null }, { "id": 7216258194, "node_id": "LA_kwDOHvvtHM8AAAABrh9ckg", "url": "https://api.github.com/repos/tedcy/blog_comments/labels/94e7884a7630c738c0cc82ae6e09a71f", "name": "94e7884a7630c738c0cc82ae6e09a71f", "color": "ededed", "default": false, "description": null } ], "state": "open", "locked": false, "assignee": null, "assignees": [], "milestone": null, "comments": 0, "created_at": "2024-07-17T12:23:17Z", "updated_at": "2024-07-17T12:23:17Z", "closed_at": null, "author_association": "OWNER", "sub_issues_summary": { "total": 0, "completed": 0, "percent_completed": 0 }, "active_lock_reason": null, "body": "https://weakyon.com/2023/07/23/understanding-of-the-cpp-memory-order.html#more \n\n ", "closed_by": null, "reactions": { "url": "https://api.github.com/repos/tedcy/blog_comments/issues/32/reactions", "total_count": 0, "+1": 0, "-1": 0, "laugh": 0, "hooray": 0, "confused": 0, "heart": 0, "rocket": 0, "eyes": 0 }, "timeline_url": "https://api.github.com/repos/tedcy/blog_comments/issues/32/timeline", "performed_via_github_app": null, "state_reason": null } ]
可以看到,检索出来issue是https://github.com/tedcy/blog_comments/issues/32,它的两个label,分别是Gitalk和94e7884a7630c738c0cc82ae6e09a71f
打开这个issue,里面的url正是https://weakyon.com/2023/07/23/understanding-of-the-cpp-memory-order.html
使用本地js脚本初始化
基本参考自https://attson.github.io/p/gitalk-init.html
但是他的脚本有很多地方需要修改:
cache机制存在问题,如果是首次使用代码,因为缺少本地和远程的cache文件,无法正确运行,也无法关闭cache机制
http接口的报错不对,只要返回内容就认为成功了,没有考虑到例如400系列的权限报错
id的生成规则和gitalk不一致,没使用md5
目录的创建规则也和我不一样,我的hexo配置是
permalink: :year/:month/:day/:title.html
因为是从别的框架迁移过来的,我有很多文章没写date,不符合hexo标准,会无法识别
最后我删除了cache机制(反正上github workflow以后,运行时间无所谓)
1 2 3 4 5 6 7 8 9 10 11 12 13 14 15 16 17 18 19 20 21 22 23 24 25 26 27 28 29 30 31 32 33 34 35 36 37 38 39 40 41 42 43 44 45 46 47 48 49 50 51 52 53 54 55 56 57 58 59 60 61 62 63 64 65 66 67 68 69 70 71 72 73 74 75 76 77 78 79 80 81 82 83 84 85 86 87 88 89 90 91 92 93 94 95 96 97 98 99 100 101 102 103 104 105 106 107 108 109 110 111 112 113 114 115 116 117 118 119 120 121 122 123 124 125 126 127 128 129 130 131 132 133 134 135 136 137 138 139 140 141 142 143 144 145 146 147 148 149 150 151 152 153 154 155 156 157 158 159 160 161 162 163 164 165 166 167 168 169 170 171 172 173 174 175 176 177 178 179 180 181 182 183 184 185 186 187 188 189 190 191 192 193 194 195 196 const fs = require ('fs' );const path = require ('path' );const readline = require ('readline' );const https = require ('https' );const md5 = require ("md5" );const config = { username : process.env .GITHUB_REPOSITORY_OWNER , repo : process.env .GITALK_INIT_REPO , blog_host : process.env .GITALK_BLOG_HOST , token : process.env .GITALK_TOKEN , postsDir : process.env .GITALK_INIT_POSTS_DIR || 'source/_posts' }; const hostname = 'api.github.com' ;const apiPath = `/repos/${config.username} /${config.repo} /issues` ;const autoGitalkInit = { getFiles (dir, files_ ) { files_ = files_ || []; const files = fs.readdirSync (dir); for (let filename of files) { let name = path.join (dir, filename); if (fs.statSync (name).isDirectory ()) this .getFiles (name, files_); else if (name.endsWith ('.md' )) files_.push (name); } return files_; }, async readItem (file ) { const fileStream = fs.createReadStream (file); const rl = readline.createInterface ({ input : fileStream, crlfDelay : Infinity }); let start = false ; let post = {}; for await (const line of rl) { if (start) { if (line.trim () === '---' ) break ; const items = line.split (':' ); if (['title' , 'desc' , 'comment' ].indexOf (items[0 ].trim ()) !== -1 ) { post[items[0 ].trim ()] = items.slice (1 ).join (":" ).trim (); } } else { if (line.trim () === '---' ) start = true ; } } fileStream.close (); if (Object .keys (post).length === 0 ) { console .log (`gitalk: warn read empty from: ${file} ` ); return null ; } if (post['comment' ] === false || post['comment' ] === 'false' ) { console .log (`gitalk: ignore by comment = ${post['comment' ]} : ${file} ` ); return null ; } if (!('title' in post)) { console .log (`gitalk: ignore because the title miss: ${file} ` ); return null ; } const filename = path.basename (file, '.md' ); const dateMatch = filename.match (/^(\d{4})-(\d{1,2})-(\d{1,2})-/ ); if (!dateMatch) { console .log (`gitalk: 日期格式错误或缺失: ${file} ` ); return null ; } let year = dateMatch[1 ]; let month = dateMatch[2 ].padStart (2 , '0' ); let day = dateMatch[3 ].padStart (2 , '0' ); post['pathname' ] = `/${year} /${month} /${day} /` + filename.replace (/^\d{4}-\d{1,2}-\d{1,2}-/ , '' ) + '.html' ; post['desc' ] = post['title' ]; return post; }, async readPosts (dir ) { const files = this .getFiles (dir); const posts = []; for (const file of files) { const post = await this .readItem (file); if (post) posts.push (post); } return posts; }, gitalkInitInvoke ({ pathname, id, title, desc } ) { const options = { method : 'POST' , hostname, path : apiPath, headers : { 'Authorization' : `token ${config.token} ` , 'Content-Type' : 'application/json' , 'User-Agent' : `${config.username} /${config.repo} ` , } }; const link = `https://${config.blog_host} ${pathname} ` ; const reqBody = { title, labels : ['Gitalk' , id], body : `[${link} ](${link} )\n\n${desc} ` }; return new Promise (resolve => const req = https.request (options, res => let data = '' ; res.on ('data' , chunk => res.on ('end' , () => { const statusCode = res.statusCode ; if (statusCode === 201 ) { resolve ([false , true ]); } else { console .error ('GitHub API 请求失败' , statusCode, data); resolve ([new Error (`GitHub API 请求失败,状态码:${statusCode} ` ), false ]); } }); }); req.on ('error' , err =>resolve ([err, false ])); req.write (JSON .stringify (reqBody)); req.end (); }); }, getIsInitByGitHub (id ) { const options = { method : 'GET' , hostname, path : `${apiPath} ?labels=Gitalk,${id} ` , headers : { 'Authorization' : `token ${config.token} ` , 'Accept' : 'application/json' , 'User-Agent' : `${config.username} /${config.repo} ` , } }; return new Promise (resolve => const req = https.request (options, res => let data = '' ; res.on ('data' , chunk => res.on ('end' , () => { const issues = JSON .parse (data); resolve ([false , issues.length > 0 ]); }); res.on ('error' , err =>resolve ([err, false ])); }); req.on ('error' , err =>resolve ([err, false ])); req.end (); }); }, async idIsInit (id ) { return this .getIsInitByGitHub (id); }, getGitalkId (pathname, title, desc ) { let id = md5 (pathname); return id.length > 50 ? `${id.substring(0 ,47 )} ...` : id; }, async start (postDir ) { const posts = await this .readPosts (postDir); for (const item of posts) { const {pathname, title, desc} = item; const id = this .getGitalkId (pathname, title, desc); const [err, exists] = await this .idIsInit (id); if (err) { console .error (`Error checking issue: [${title} ]` , err); continue ; } if (exists) { console .log (`已初始化: ${title} ` ); continue ; } console .log (`初始化评论开始...: ${title} ` ); const [e, res] = await this .gitalkInitInvoke ({id, pathname, title, desc}); if (e || !res) { console .error (`Error 初始化失败 [${title} ]` , e); continue ; } console .log (`初始化评论成功!: ${title} ` ); } } }; autoGitalkInit.start (config.postsDir ).then (() => console .log ('end' ));
运行:
1 2 3 4 5 ~ GITHUB_REPOSITORY_OWNER=tedcy GITALK_TOKEN=xxx GITALK_INIT_REPO=blog_comments GITALK_BLOG_HOST=weakyon.com node gitalk_init.js 已初始化: CPP思维导图 省略... 已初始化: 为什么我用这个blog end
注意,如果token配置权限有问题,会报错例如,可以看下面的创建token :
1 2 3 4 5 6 7 初始化评论开始...: CPP思维导图 GitHub API 请求失败 401 {"message":"Bad credentials","documentation_url":"https://docs.github.com/rest","status":"401"} Error 初始化失败 [CPP思维导图] Error: GitHub API 请求失败,状态码:401 at IncomingMessage.<anonymous> (D:\tedcy\gitalk_init.js:124:34) at IncomingMessage.emit (node:events:526:35) at endReadableNT (node:internal/streams/readable:1408:12) at process.processTicksAndRejections (node:internal/process/task_queues:82:21)
创建token
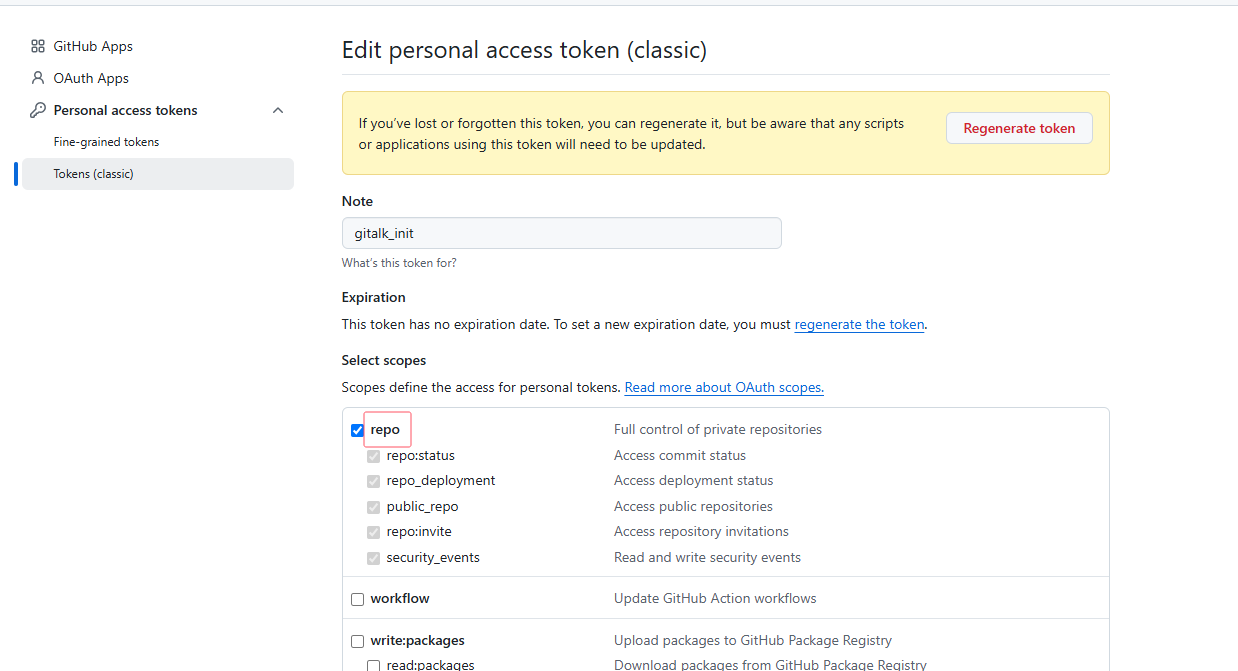
从 GitHub 的 Personal access tokens 页面,在Personal access tokens (classic)点击 Generate new token ,随后记下token
然后给这个token加上需要的权限,勾上repo
配置github workflow
创建workflow密钥
看这里https://blog.csdn.net/sculpta/article/details/106474324
创建一个BUILD_GITHUB_IO_GITALK的key,把刚才获取的token填进去
创建workflow
在项目的.github/workflows创建gitalk.yml
1 2 3 4 5 6 7 8 9 10 11 12 13 14 15 16 17 18 19 20 21 22 23 24 25 26 27 28 29 30 31 32 33 34 35 36 37 38 39 40 41 42 43 name: GITALK_INIT on: [push ]jobs: gitalk_init: runs-on: ubuntu-latest steps: - uses: actions/checkout@v3 - uses: actions/setup-node@v3 with: node-version: 18 - run: npm install --legacy-peer-deps - name: Run gitalk_init run: | # 设置环境变量GITALK_TOKEN,从GitHub repo安全环境变量(secrets)中获取 export GITALK_TOKEN=${{ secrets.BUILD_GITHUB_IO_GITALK }} export GITHUB_REPOSITORY_OWNER=tedcy export GITALK_INIT_REPO=blog_comments export GITALK_BLOG_HOST=weakyon.com node gitalk_init.js
25.4.20更新:github被墙导致gitalk无法显示
根据https://prohibitorum.top/7cc2c97a15b4
记一次 Hexo Next 主题下 Gitalk 无法获取 Github Token 问题
目前博客采用的 Gitalk 来作为帖子的评论系统
其原理是通过帖子名来生成一个唯一 id ,用这个在 Github 仓库下开一个 issue ,这个 issue 就成为帖子的评论仓库了
由于要操作到 Github 仓库,所以是需要借助 Github 的开放 API 来完成的
其中有一步需要获取一个 access_token ,操蛋的是,这个 API 是不支持跨域访问的
1 https://github.com/login/oauth/access_token
所幸 Gitalk 使用了亚马逊的云服务代理里这个接口
1 https://cors-anywhere.azm.workers.dev/https://github.com/login/oauth/access_token
看起来没问题了,更操蛋的又来了,这个地址被墙了,意味着现在没法代理接口了,要么自己买服务器代理接口,要么科学上网
博主自己搭建了一个服务,原理是
官方的接口返回的是一串类似 URL 参数的东西,如下
1 access_token=****************&scope=public_repo&token_type=bearer
而亚马逊的代理会把它转成 json 格式返回,所以这里我们也需要转成 json 格式
可以简单用他已经部署好的服务,修改next配置文件中gitalk的部分
如果不想折腾,只需把配置下的 proxy 改为 https://cors-server-ecru.vercel.app/github_access_token 即可
但是他的这个域名,国内大部分地区都ping不通,访问速度也不太行
而且api.github.com也经常被墙,导致获取issue例如https://api.github.com/repos/tedcy/blog_comments/issues?labels=Gitalk,94e7884a7630c738c0cc82ae6e09a71f经常失效
我正好有自己备案过的域名和云服务器,那么不如自己搭建代理来解决问题
access_token代理
装一个带lua插件的nginx就行了,这里直接安装openresty
我是centos:
1 2 3 4 5 6 7 8 ~ lsb_release -a LSB Version: :core-4.1-amd64:core-4.1-noarch Distributor ID: CentOS Description: CentOS Linux release 8.2.2004 (Core) Release: 8.2.2004 Codename: Core ~ dnf config-manager --add-repo https://openresty.org/package/centos/openresty.repo ~ dnf install -y openresty
随后就可以使用指定配置文件的方式启动原本nginx下的配置文件了
1 2 3 4 ~ openresty -c /etc/nginx/nginx.conf -t nginx: the configuration file /etc/nginx/nginx.conf syntax is ok nginx: configuration file /etc/nginx/nginx.conf test is successful ~ openresty -c /etc/nginx/nginx.conf
然后还需要给openresty安装需要的httplib
1 2 3 4 ~ cd /usr/local/openresty/lualib/resty/ ~ curl https://raw.githubusercontent.com/ledgetech/lua-resty-http/v0.16.1/lib/resty/http.lua -o http.lua ~ curl https://raw.githubusercontent.com/ledgetech/lua-resty-http/v0.16.1/lib/resty/http_connect.lua -o http_connect.lua ~ curl https://raw.githubusercontent.com/ledgetech/lua-resty-http/v0.16.1/lib/resty/http_headers.lua -o http_headers.lua
接着就可以nginx配置文件编码了,主要要实现几个功能:
开启ssl,因为https使用http的接口会造成跨域问题
跨域源域名配置Access-Control-Allow-Origin只能*或者具体域名,所以需要根据来源域名动态配置希望跨域的域名
在lua代码中把获取到的参数,再使用json encode来返回
具体的配置文件如下
1 2 3 4 5 6 7 8 9 10 11 12 13 14 15 16 17 18 19 20 21 22 23 24 25 26 27 28 29 30 31 32 33 34 35 36 37 38 39 40 41 42 43 44 45 46 47 48 49 50 51 52 53 54 55 56 57 58 59 60 61 62 63 64 65 66 67 68 69 70 71 72 73 74 75 76 77 78 79 80 81 82 83 84 85 86 87 88 89 server { listen 3390 ssl; ssl_certificate cert/j3dh.com.pem; ssl_certificate_key cert/j3dh.com.key; ssl_session_timeout 5m ; ssl_ciphers ECDHE-RSA-AES128-GCM-SHA256:ECDHE:ECDH:AES:HIGH:!NULL:!aNULL:!MD5:!ADH:!RC4; ssl_protocols TLSv1 TLSv1.1 TLSv1.2 ; ssl_prefer_server_ciphers on ; error_log /var/log/nginx/github-proxy-error .log debug ; resolver 8.8.8.8 ; location /github_access_token { if ($request_method = 'OPTIONS' ) { add_header 'Access-Control-Allow-Origin' '*' always; add_header 'Access-Control-Allow-Methods' 'GET, POST, OPTIONS' always; add_header 'Access-Control-Allow-Headers' '*' always; add_header 'Content-Length' 0 ; return 204 ; } proxy_hide_header Access-Control-Allow-Origin; set $cors_origin "" ; if ($http_origin = "https://weakyon.com" ) { set $cors_origin $http_origin ; } if ($http_origin = "http://localhost:4000" ) { set $cors_origin $http_origin ; } if ($cors_origin != "" ) { add_header 'Access-Control-Allow-Origin' "$cors_origin " always; } add_header 'Access-Control-Allow-Credentials' 'true' always; add_header 'Access-Control-Allow-Methods' '*' always; add_header 'Access-Control-Allow-Headers' '*' always; content_by_lua_block { local http = require("resty.http" ) local cjson = require("cjson.safe" ) ngx.req.read_body() local body_data = ngx.req.get_body_data() ngx.log(ngx.ERR, "请求体数据: " , body_data or "[空]" ) local httpc = http.new() local res, err = httpc:request_uri("https://github.com/login/oauth/access_token" , { method = "POST" , body = body_data, headers = { ["Content-Type"] = ngx.req.get_headers()["Content-Type"], ["Accept"] = "application/json", }, ssl_verify = false , --如果服务器无ssl证书可关闭校验,这里为github可设为true }) if not res then ngx.status = 500 ngx.say(cjson.encode({error="Proxy Request Error", details=err})) ngx.log(ngx.ERR, " 请求GitHub OAuth接口失败: ", err) return end ngx.status = res.status ngx.header[" Content-Type"] = " application/json; charset=utf-8" ngx.log(ngx.ERR, "GitHub接口返回Status: ", res.status) ngx.log(ngx.ERR, "GitHub接口返回Body: ", res.body) -- github若返回标准json则无需再转换,直接返回 if res.headers["Content-Type" ]:find("application/json" ) then ngx.say(res.body) return end -- 若返回的是url参数字符串,手动转json: local args = ngx.decode_args(res.body) ngx.say(cjson.encode(args)) } } }
api.github.com代理
这个就简单多了,因为apt.github.com本身就支持跨域,只是被墙了,因此只需要解决只想要自己希望的域名跨域的问题就行了
1 2 3 4 5 6 7 8 9 10 11 12 13 14 15 16 17 18 19 20 21 22 23 24 25 26 27 28 29 30 31 32 33 34 35 36 37 38 39 40 41 42 43 server { listen 3389 ssl; ssl_certificate cert/j3dh.com.pem; ssl_certificate_key cert/j3dh.com.key; ssl_session_timeout 5m ; ssl_ciphers ECDHE-RSA-AES128-GCM-SHA256:ECDHE:ECDH:AES:HIGH:!NULL:!aNULL:!MD5:!ADH:!RC4; ssl_protocols TLSv1 TLSv1.1 TLSv1.2 ; ssl_prefer_server_ciphers on ; location / { proxy_pass https://api.github.com/; proxy_set_header Host api.github.com; proxy_set_header Accept "application/vnd.github+json" ; proxy_set_header User-Agent "tedcy" ; proxy_ssl_server_name on ; proxy_ssl_protocols TLSv1.2 TLSv1.3 ; proxy_hide_header Access-Control-Allow-Origin; set $cors_origin "" ; if ($http_origin = "https://weakyon.com" ) { set $cors_origin $http_origin ; } if ($http_origin = "http://localhost:4000" ) { set $cors_origin $http_origin ; } if ($cors_origin != "" ) { add_header 'Access-Control-Allow-Origin' "$cors_origin " always; } } }
最后再新增一个gitalk_proxy.js的脚本,在hexo的scripts目录下面,用于劫持api.github.com到我的代理上
1 2 3 4 5 6 7 8 9 10 11 12 13 14 hexo.extend .injector .register ('head_end' , function ( return ` <script src="https://unpkg.com/ajax-hook@2.1.3/dist/ajaxhook.min.js"></script> <script> ah.proxy({ onRequest: (config, handler) => { // 替换请求api.github.com请求为目标反代地址 config.url = config.url.replace('https://api.github.com','https://www.j3dh.com:3389'); handler.next(config); } }); </script> ` ;});
参考资料
hexo官方文档
Hexo-Next 主题博客个性化配置超详细,超全面(两万字)
windows下使用hexo搭建博客
https://theme-next.js.org/
